Unit Testing with PlatformIO: Part 2. Running tests on an embedded target
Preparing new environment and getting test results from an embedded device
In most cases, testing on a host machine is enough to find almost all sorts of typical programming errors (integer overflow, off-by-one error, etc) in the business logic of an embedded application, but it is not the same as testing on the real hardware.
A different compiler, endianness, or even unpredictable hardware issues can greatly affect the correctness of the code.
This is the second part of a three-part blog series where we’re setting up a testing environment for embedded development. In the first post, we briefly went through the basics of testing within the PlatformIO ecosystem, created a useful data structure called circular buffer and tested it on a host machine.
In this post, we will continue to set up a convenient testing environment for our project. We will be using SiFive HiFive-RevB - a low-cost RISC-V board based on FE310-G002 microcontroller from SiFive.
Table of Contents
Prerequisites
Adding a New Environment
In this part, we’ll carry on working with the project from the previous post. Adding new hardware is as easy as adding several new lines to the platformio.ini file:
[env:native]
platform = native

[env:hifive1-revb]
platform = sifive
framework = freedom-e-sdk
board = hifive1-revb
The configuration file is pretty simple, the first two lines we already discussed in the previous post, the new environment hifive1-revb includes general information about the platform, framework, board and describes the new embedded target on which we want to run our tests (no need to install the sifive dev-platform manually, PlatformIO will do it automatically before the first compilation).
Adding Custom Test Transport
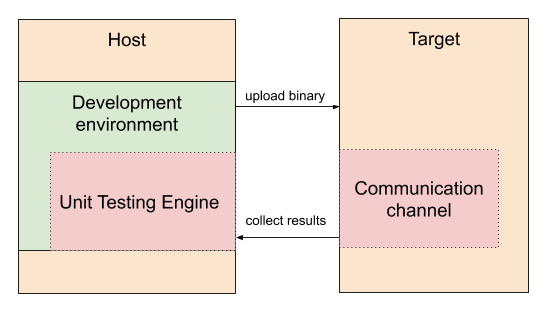
Usually, the test sequence consists of compiling and deploying a test executable from a host machine, starting it on the embedded side, and collecting the test results via some sort of communication channel. After that, the host machine analyzes the logs and provides a detailed report.
PlatformIO Unit Testing Engine supports several means of transport for popular frameworks/SDKs. But, for this article, we will deliberately use an unsupported low-level framework to show you how easy it is to add a custom communication channel for collecting test results. Rerouting testing output boils down to reconfiguring the Unity test runner via a custom configuration header file called unity_config.h. Besides generic Unity’s configuration options, this file can also contain several macros that allow us to redirect test results elsewhere:
UNITY_OUTPUT_START()
UNITY_OUTPUT_CHAR(c)
UNITY_OUTPUT_FLUSH
UNITY_OUTPUT_COMPLETE
These macros should point to functions responsible for printing results according to hardware configuration. Fortunately, the board used in this article has an on-board debug probe that also acts as a virtual COM port. The Freedom SDK framework is configured to redirect the printf output to that virtual COM port which greatly simplifies the implementation of the custom test transport for our case:
The typical unity_config.h file with function declarations looks like this:
#ifndef UNITY_CONFIG_H
#define UNITY_CONFIG_H

#ifndef NULL
#ifndef __cplusplus
#define NULL (void*)0
#else
#define NULL 0
#endif
#endif

#ifdef __cplusplus
extern "C"
{
#endif

void unityOutputStart();
void unityOutputChar(char);
void unityOutputFlush();
void unityOutputComplete();

#define UNITY_OUTPUT_START()    unityOutputStart()
#define UNITY_OUTPUT_CHAR(c)    unityOutputChar(c)
#define UNITY_OUTPUT_FLUSH()    unityOutputFlush()
#define UNITY_OUTPUT_COMPLETE() unityOutputComplete()

#ifdef __cplusplus
}
#endif /* extern "C" */

#endif /* UNITY_CONFIG_H */
And the accompanying source file unity_config.c with the function implementations:
#include <stdio.h>
#include "unity_config.h"

void unityOutputStart() {}

void unityOutputChar(char c) {
    printf("%c", c);
}

void unityOutputFlush() {}

void unityOutputComplete() {}
In our case, we need to properly implement only one function unityOutputChar that redirects the test output to the virtual COM port via the printf function. Note that both unity_config.h and unity_config.c should be placed in the root of your test folder.
Now we are ready to run our test on the real hardware. After connecting the board and validating that it’s visible to our OS, we can select our environment on the PlatformIO toolbar and run the tests:

That’s it! Now, we can run tests on the real board as well.
Summary
When developing software for an embedded device, testing only on a host machine is usually not sufficient enough to cover all possible issues. Ideally, a development environment should be capable of running tests on both ends: a host machine and a target device. Besides, creating a proper communication channel to represent test results on a host machine may turn out to be a tedious task that requires a lot of manual work from developers.
In this article, we explored how PlatformIO solves that problem by abstracting away all heavy lifting. We looked into the process of running tests directly on the embedded device by implementing a custom test transport for collecting results from the SiFive HiFive-RevB board on the fly.
In the In the next post, we will explore how to run the tests on a CI service on both native and embedded sides by utilizing an advanced PlatformIO feature called Remote.
Stay in touch with us
Stay tuned to this blog or follow us on LinkedIn and Twitter @PlatformIO_Org to keep up to date with the latest news, articles and tips!