Setting up PlatformIO for CI/CD with Testing, Code Coverage and Versioning
Guest post
Leveraging PlatformIO for Effortless Continuous Integration and Delivery in Collaborative Environments for Optimized Embedded Software Deployment Workflow
Today almost all professional software development is executed using an agile methodology with version control, automatic testing and builds in the cloud. However, this is not yet very common for firmware development.
This article explores how to set up a PlatformIO project and benefit from all the CI/CD features of modern software development approaches.
Table of Contents
- Project Requirements
- Getting Started
- Demo Time
- Conclusion
- Appendix 1: Why do we need all of this?
- Appendix 2: Testing the private internals of a C++ class
- Appendix 3: A single source file built in both environments
- Appendix 4: Step-by-step review of the buildinfo.py extra script
- Appendix 5: Step-by-step review of Github Actions configuration file
- Further Improvements
Project Requirements
Let’s first list the requirements for our development environment:
- Builds
- be able to do a local development build on the development machine
- be able to do a production build in the cloud and archive the binary
- Testing
- run selected unit tests, on the desktop as well as on the target
- run all unit tests, on the desktop, target, as well as in the cloud
- generate a test coverage report, locally and in the cloud
- Versioning
- use semantic versioning, e.g. v1.2.3
- every build “knows” its type (development/production/etc.)
- every build “knows” its version
- whenever merging into the main branch, the version is automatically incremented, a release is created and sources and binary are attached to this release
If the purpose of any of these requirements is not immediately clear, appendix 1 clarifies the rationale behind them.
Getting Started
Step 1: Project Environments
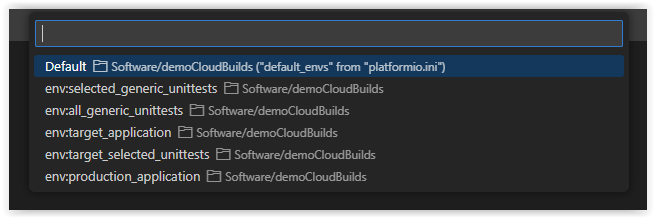
The first step is to set up platformio.ini with a number of environments. Each environment will map onto a type of build (development/production/etc.). Separate environments will also take care of the testing. Here is a list of environments to get started:
selected_generic_unittestsall_generic_unitteststarget_selected_unitteststarget_applicationproduction_application
Selecting the correct environment is simple from the bottom toolbar:

To ensure all environments use consistent parameters, we define those parameters in the [options] section and reuse those definitions in the [env:] sections.
Environments intended for the target hardware have to configure the specifics of the board, framework, debug interface, etc.:
[options]
platform = atmelavr
board = uno
framework = arduino
Unit tests require some additional build flags to generate the coverage info. Specific tests can be selected with the test_filter option:
unittesting_buildflag = -D unitTesting
generic_hw_buildflag = -D generic_hw
coverage_buildflag =
  -lgcov
  --coverage
  -fprofile-abs-path
  -Og
After defining the parameters in the [options] section, you can use them in any environment, as shown in the example below:
[env:target_selected_unittests]
platform = ${options.platform}
board = ${options.board}
framework = ${options.framework}

build_flags =   ${options.unittesting_buildflag}

test_framework = unity
test_filter = ${options.selected_tests}
Step 2: Build Info Injection
For the firmware to “know” what kind of build it is, we could use some compiler build flags, but this quickly becomes difficult to manage when we need more than a few settings. So instead I use a pair of files buildinfo.h/.cpp, which are generated at the beginning of the build process and included into the application:
// buildinfo.h

#pragma once

#include "stdint.h"
#include "buildtype.h"
#include "buildenvironment.h"

class version {
  public:
    version() = delete;
    static uint8_t getIsVersionMajor() { return isVersionMajor; }
    static uint8_t getIsVersionMinor() { return isVersionMinor; }
    static uint8_t getIsVersionPatch() { return isVersionPatch; }
    static buildType getBuildType() { return theBuildType; }
    static buildEnvironment getBuildEnvironment() { return theBuildEnvironment; }
    static void setIsVersion();
    static const char* getIsVersionAsString() { return isVersionString; }

#ifndef unitTesting
  private:
#endif
    static uint8_t isVersionMajor;
    static uint8_t isVersionMinor;
    static uint8_t isVersionPatch;

    static buildType theBuildType;
    static buildEnvironment theBuildEnvironment;

    static constexpr uint8_t maxVersionStringLength{16U};
    static char isVersionString[maxVersionStringLength];
};
// buildinfo.cpp

#include "version.h"
#include "buildinfo.h"
#include <stdio.h>

uint8_t version::isVersionMajor{0};
uint8_t version::isVersionMinor{0};
uint8_t version::isVersionPatch{0};
buildType version::theBuildType{buildType::unknown};
buildEnvironment version::theBuildEnvironment{buildEnvironment::unknown};

char version::isVersionString[maxVersionStringLength]{};

void version::setIsVersion() {
    isVersionMajor      = buildInfo::mainVersionDigit;
    isVersionMinor      = buildInfo::minorVersionDigit;
    isVersionPatch      = buildInfo::patchVersionDigit;
    theBuildType        = buildInfo::theBuildType;
    theBuildEnvironment = buildInfo::theBuildEnvironment;

    snprintf(isVersionString, maxVersionStringLength, "v%d.%d.%d", isVersionMajor, isVersionMinor, isVersionPatch);
}
This is only an example of what works for me and I use C++, but you will find it easy to adjust it to your specific needs.
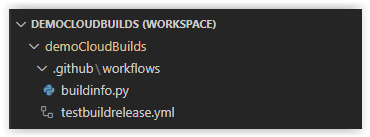
When doing local builds, these files are generated with a Python script buildinfo.py. On the cloud builds it is generated from a Github action declared in testbuildrelease.yml. I keep them together in the .github/workflows folder:
When the application includes the buildinfo.h file, it gets access to all the build info that can be used for multiple purposes, for example:
- show the actual version of the firmware on the startup screen
- enable logging to UART only on a local development build and diable in production builds
- identify development builds, e.g. with different UI colors, so they won’t accidentally get installed at the customer side
- determine the age of the firmware based upon its build timestamp
Step 3: Versioning Essentials
To keep track of the version, we use the well-known semantic versioning scheme, abbreviated SemVer, where a version looks like v1.2.3. The digits refer to the major version, minor version, patch version. Every time we do a release, one of the digits is incremented:
- the major version increments on new features which are no longer backward compatible
- the minor version increments on new features which are backward compatible
- the patch version increments on bug fixes or code improvements without functional changes
More info on semantic versioning see Semantic Versioning 2.0.0
When we do a local build, instead of incrementing SemVer digits, we simply add the latest (short) commit hash to the version, for example v1.2.3-a2e4d5c7. While developing, we usually create many different versions in between releases, but by using the commit hash, we can easily match any binary with its source.
When we merge changes from the develop branch into main, a Github Actions workflow will run and analyze the title of the merge commit. If this title contains major we create a major release. Similar for the word minor which creates a minor release. In all other cases we create a patch release. For convenience, each build also has a timestamp, e.g. 2023-10-15 12:34:56.
Step 4: Testing with Code Coverage
In order to know what we have actually tested, code coverage is supported, locally and via Github Actions. Locally, we use a VSCode extension such as GCOV viewer (see my previous article Getting Started with Code Coverage in PlatformIO: A Beginner’s Guide to Writing Effective Tests).
When building in the cloud with Github Actions, we connect the repository to the codecov.io service. Codecov is free for public repositories and there is good getting started documentation available here. After setting this up, our Github action will send the coverage results to Codecov and we will be able to browse the results report in an interactive way.
Demo Time
Now it’s time to see it all in action!
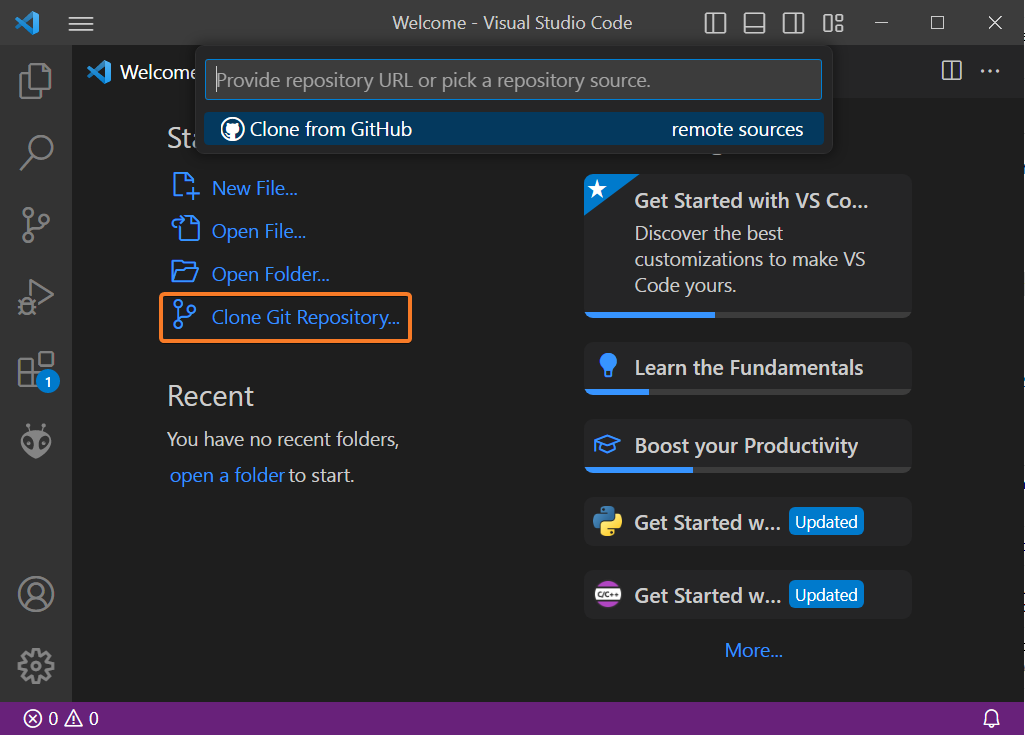
I’ve set up a (template) Github repository so it’s easy to replicate it on your side. You can import it directly from the VSCode Welcome Page:
As for the actual target hardware, I am using the Arduino Uno board to keep things simple, but you can easily adapt that to a board of your preference by modifying the hardware settings in the [options] section of platformio.ini.
The repository has 2 branches: main and develop. Locally, we work on develop. The main branch is protected from committing directly, so you can only merge develop into main, which will then automatically create a release. The repository also has a v0.0.0 release as a starting point to simplify the scripts.
Step 1: Local Development
First, make sure you are on the develop branch. Let’s assume you are working on the lib/circularbuffer library. The tests for this library are in test/test_generic_circularbuffer. The environment [env:selected_generic_unittests] uses a test filter so it only runs the tests for the library we’re working on. This approach keeps the test-driven-design cycles fast.
At any time you can simply run the unit tests to quickly validate your work on this library. With the GCOV viewer you can easily check what code has been tested.
If at any time you want to verify that all other unit tests are still passing, simply switch to the [env:all_generic_unittests] and run the tests. Of course it takes a bit longer, but it’s always reassuring that changes on your library under development did not break anything somewhere else in the project.
Assuming all unit tests are green, the next step could be to build and upload the application to the target. Simply change the environment to [env:target_application] and choose upload.
Before the build, the Python script .github/workflows/buildinfo.py will be executed. This script creates buildinfo.h/.cpp files containing useful info about the current build. This info is then available to the application for whatever purpose, as is shown in the example application in src/main.cpp:
#include <Arduino.h>
#include "version.h"
#include "buildinfo.h"

void setup() {
    Serial.begin(115200);
}

void loop() {
    version::setIsVersion();
    Serial.print("Version ");
    Serial.println(version::getIsVersionAsString());
    Serial.print(toString(buildInfo::theBuildEnvironment));
    Serial.print(" ");
    Serial.print(toString(buildInfo::theBuildType));
    Serial.print(" build, ");
    Serial.println(buildInfo::buildTimeStamp);
    Serial.print("\n\n");
    delay(3000);
}
Step 2: Committing Changes
Assuming you are happy with the application running on the target, let’s do a commit and push it to Github. This will trigger a workflow in the cloud which does the following:
- start a fresh (virtual) Linux machine
- install PlatformIO on it
- checkout the repository to it
- run all unit tests
- build the application using the latest version plus a commit hash
If all of this is successful, the workflow run will turn green and have the resulting binary file attached to it, so it’s easy to refer and go back to this build any time later.
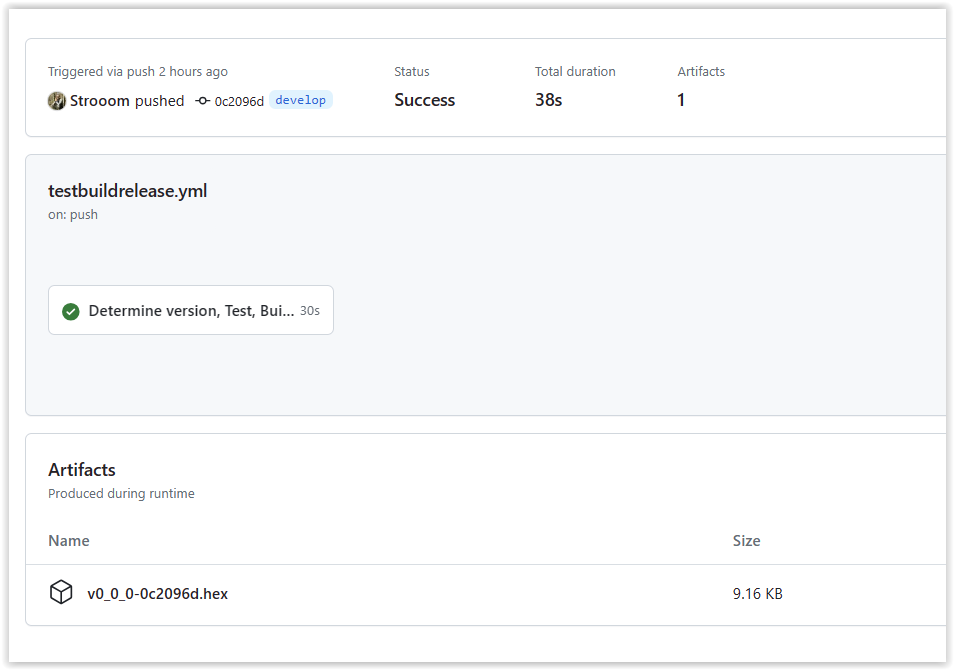
If the workflow fails, you’ll be notified by email and/or on Github mobile app. There are several steps included in the workflow which output the state of the current run and should allow you to quickly troubleshoot it.
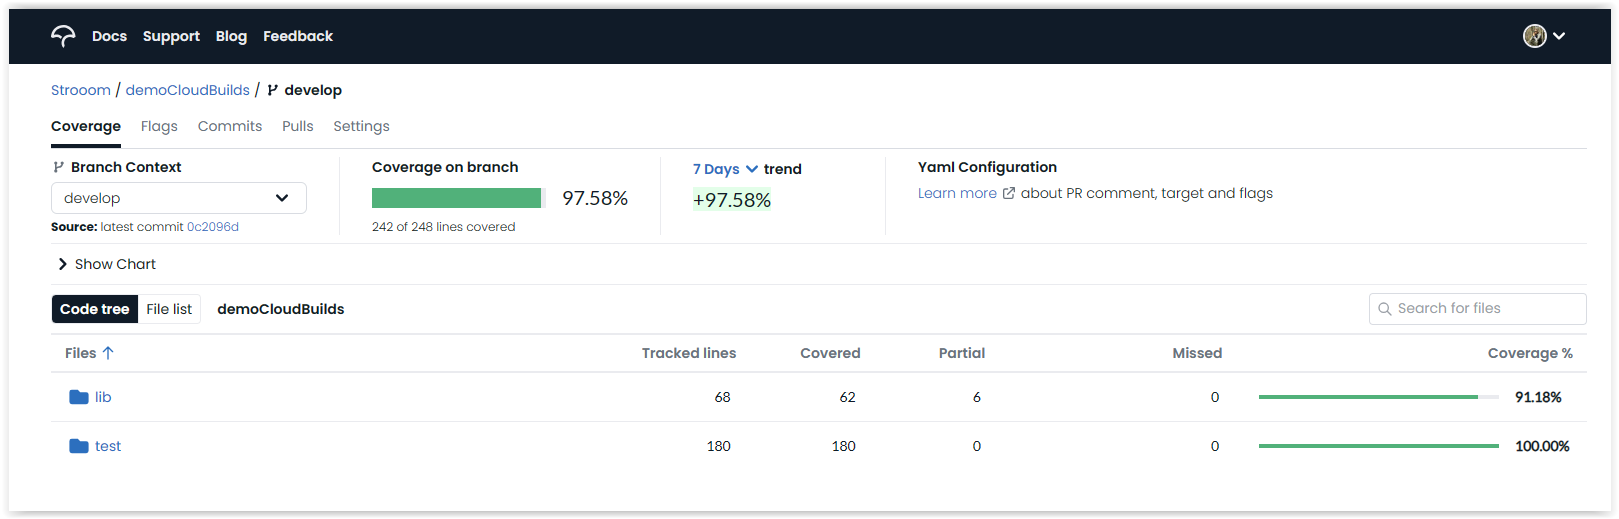
One of the steps pushes the coverage report from unit testing to codecov.io, so we can see the results there:
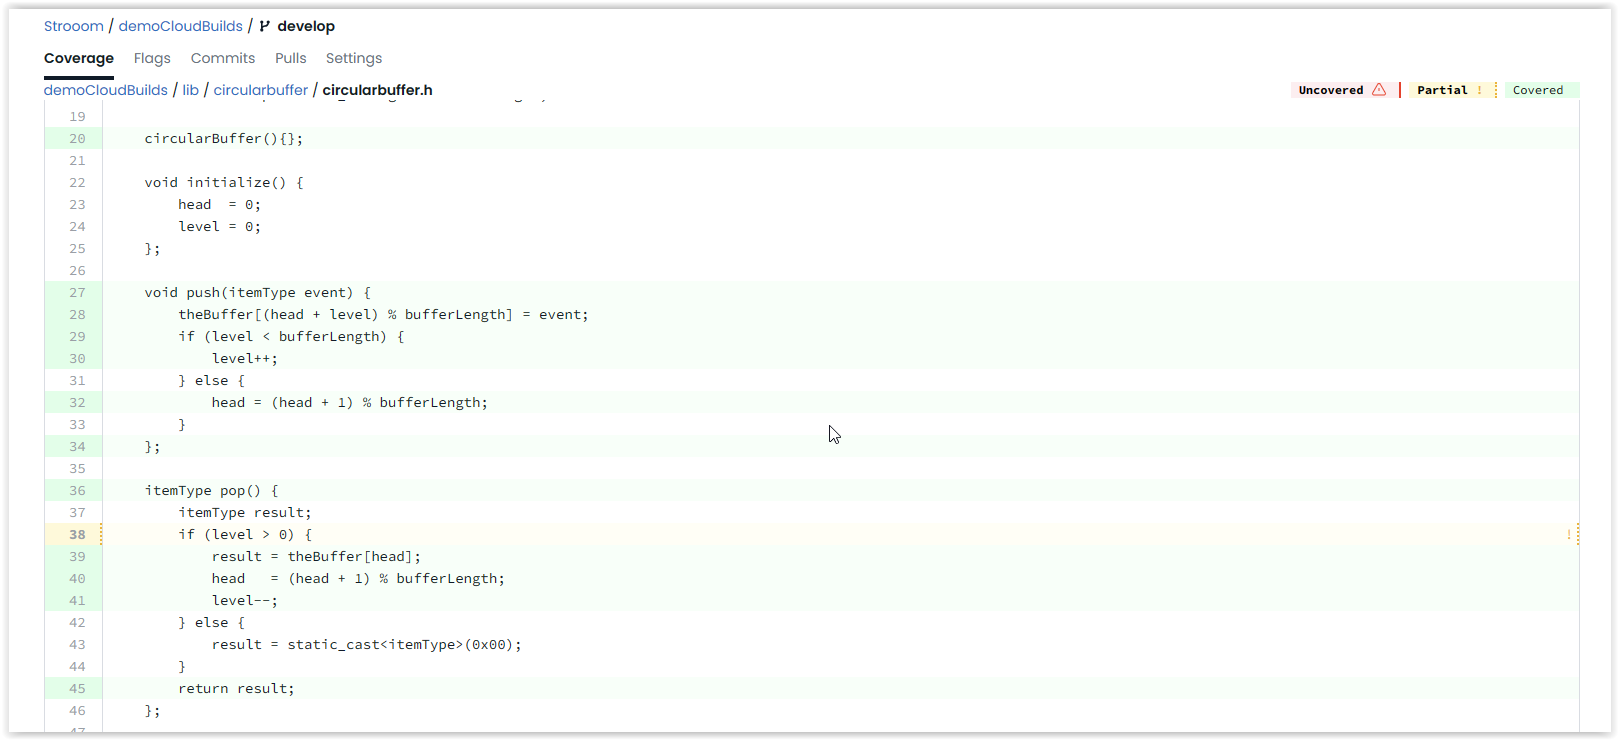
And you can drill down into each file to see which code is not yet tested, marked in red or yellow:
Step 3: Releasing Project
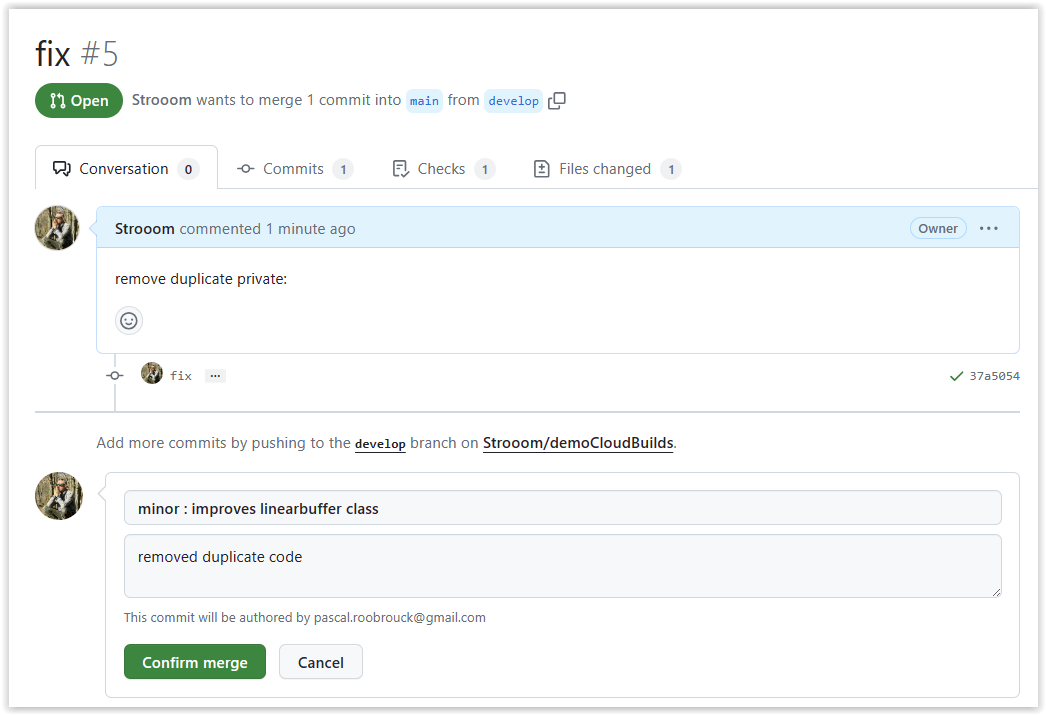
Now, assume we are still doing fine and we decide that the latest commit to develop is ready to be released. Go into Github and create a pull request to start the merge of develop into main. Then when Github confirms everything can be merged, give the merge commit a name which starts with “minor”:
The merge commit will again trigger the workflow to run, but on the main branch this time. Furthermore, the major or minor keyword in the merge commit name will be recognized by the workflow and result in the creation of a new version and related release. The binary file as well as the source code will be attached to the release:

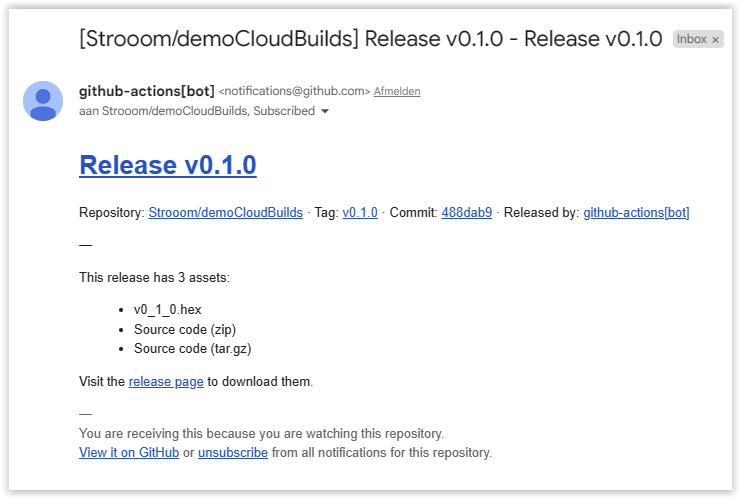
And Github will send a notification email to the team that there is a new release:
Conclusion
VSCode with PlatformIO provides all the features needed for a professional embedded software development setup:
- multiple environments for a project allow easy switching between unit testing and building target application
- using options simplifies the managing of these environments and keeps them consistent
- seamless integration with Github opens the path to builds in the cloud
- builds in the cloud simplify development distributed over a team
- Python scripting enables automation of tasks, such as automatic SemVer versioning
Appendix 1: Why do we need all of this?
- The target hardware is often connected to your local machine through a debug interface. The most common workflow is to write code, build a binary and download to the target.
- When working with multiple developers on an application, who has the latest official release? By doing the build in the cloud, you ensure the releases are always unique and in a central location.
- Test-driven Design (TDD) works best with fast build/test cycles, i.e. a few seconds. So when working on a particular area, you only want those tests being executed. Skipping all other tests reduces the cycle from minutes to seconds.
- However, before merging your new stuff into the main branch, you want to be sure your new code does not break anything else, so here we want to run all tests.
- A Test-Coverage report will give you a metric on the overall progress of your development. It will also show which areas may need more attention.
- During development, some features may be enabled (e.g. logging) and others disabled (e.g. firmware updates). In order to make sure that the production version for the customer has all the right features, we enable/disable them automatically by allowing the firmware build to know what type it is.
Appendix 2: Testing the private internals of a C++ class
The private members of a class are inaccessible for code outside that class. But for unit testing, I often would like to make an exception, as it is easier to verify the correct functioning of the code if the tests are allowed to look at the private internals of the class.
A pragmatic approach is to add an additional build flag to the unit test builds (e.g. unitTesting) and exclude the private keyword from the source code for these kinds of builds.
In platformio.ini we can add the following option:
unittesting_buildflag = -D unitTesting
which we apply to all unit testing builds:
[env:selected_generic_unittests]
platform = native

build_flags =
  ${options.unittesting_buildflag}
  ${options.generic_hw_buildflag}
  ${options.coverage_buildflag}
which then can be used in any class definition where you want the unit tests to have access to the private members:
#ifndef unitTesting
  private:
#endif
    uint32_t head{0};
    uint32_t level{0};
    itemType theBuffer[bufferLength]{};
In this example (circularbuffer.h) the unit tests can directly check the head and level of the buffer, for example in the following test:
void test_initialize() {
    constexpr uint32_t testBufferLength{4};
    circularBuffer<uint8_t, testBufferLength> theBuffer;
    TEST_ASSERT_EQUAL_UINT32(0, theBuffer.head);
    TEST_ASSERT_EQUAL_UINT32(0, theBuffer.level);
    TEST_ASSERT_EQUAL_UINT32(testBufferLength, theBuffer.length);
    TEST_ASSERT_TRUE(theBuffer.isEmpty());
    TEST_ASSERT_FALSE(theBuffer.hasEvents());
}
Appendix 3: A single source file built in both environments
Sometimes the code we write could run on the target as well as on our desktop machine, but it requires small changes in order to build correctly. For example, on the Arduino platform, some C-string handling functions such as strlen require the main Arduino header file Arduino.h. However, for the desktop scenario, there is no Arduino.h file and we need include *
To deal with this, there is another build flag, which allows the code to know if we are building for target or for generic desktop hardware:
generic_hw_buildflag = -D generic_hw
Inside the code, we can use this to include the correct header as is shown here in the tests for the version library:
#ifndef generic_hw
#include <Arduino.h>
#else
#include <cstring>
#endif
So now we can use strlen in this test and it will work fine on both targets.
This approach can be further extended into the code itself. Provide mocks for certain hardware and use the mocks during desktop unit testing, use the real hardware when testing on the actual target hardware.
Appendix 4: Step-by-step review of the buildinfo.py extra script
First step is to run a Git command git describe --tags to get the latest tag and strip off any spaces from it:
# determine the latest releasev semver
latest_release_tag = subprocess.run(["git", "describe", "--tags"], stdout=subprocess.PIPE, text=True)
latest_release_tag = latest_release_tag.stdout.strip()
print ("\033[93;1;4mLatest Release Tag     : " + latest_release_tag + "\033[0m")
Next we split the output into its parts:
# determine last release version
latest_release_tag_parts = latest_release_tag.split("-")
latest_release_semver_incl_v = latest_release_tag_parts[0]
latest_release_semver = latest_release_semver_incl_v[1:]
latest_release_digits = latest_release_semver.split(".")
latest_release_main = latest_release_digits[0]
latest_release_minor = latest_release_digits[1]
latest_release_patch = latest_release_digits[2]
print ("\033[93;1;4mLatest Release Main    : " + latest_release_main + "\033[0m")
print ("\033[93;1;4mLatest Release Minor   : " + latest_release_minor + "\033[0m")
print ("\033[93;1;4mLatest Release Patch   : " + latest_release_patch + "\033[0m")
One more Git command will fetch the commit hash while the timestamp is retrieved from the OS:
# determine current commit hash
current_commit_hash = subprocess.run(["git", "rev-parse", "--short", "HEAD"], stdout=subprocess.PIPE, text=True)
current_commit_hash = current_commit_hash.stdout.strip()
print ("\033[93;1;4mCurrent Commit Hash    : " + current_commit_hash + "\033[0m")

# determine the build timstamp
build_timestamp = datetime.now().strftime("%Y-%b-%d %H:%M:%S")
print ("\033[93;1;4mBuild Timestamp        : " + build_timestamp + "\033[0m")
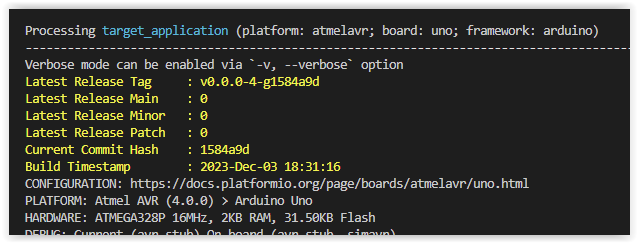
Notice the print commands, they will show the output in yellow in the build terminal:
Finally, the different elements are written to the buildinfo.cpp file:
# store the results in a source file, so our source code has access to it
include_file = open("lib/version/buildinfo.cpp", "w")
include_file.write("// ##########################################################################\n")
include_file.write("// ### This file is generated by Build and Continuous Integration scripts ###\n")
include_file.write("// ###   .github/workflows/buildinfo.py for local development environment ###\n")
include_file.write("// ###   .github/workflows/testbuildrelease.yml for CI environment        ###\n")
include_file.write("// ### Changes will be overwritten on the next build                      ###\n")
include_file.write("// ##########################################################################\n")
include_file.write("\n")
include_file.write("#include \"buildinfo.h\"\n")
include_file.write("\n")
include_file.write("const buildEnvironment buildInfo::theBuildEnvironment{buildEnvironment::local};\n")
include_file.write("const buildType buildInfo::theBuildType{buildType::development};\n")
include_file.write("const int buildInfo::mainVersionDigit   = " + latest_release_main + ";\n")
include_file.write("const int buildInfo::minorVersionDigit  = " + latest_release_minor + ";\n")
include_file.write("const int buildInfo::patchVersionDigit  = " + latest_release_patch + ";\n")
include_file.write("const char* buildInfo::lastCommitTag    = \"" + current_commit_hash + "\";\n")
include_file.write("const char* buildInfo::buildTimeStamp   = \"" + build_timestamp + "\";\n")
include_file.close()
Appendix 5: Step-by-step review of Github Actions configuration file
The following code makes the workflow run on a Ubuntu runner when there is a push on main and develop branches:
name: Test, Build and Release
on:
  workflow_dispatch:
  push:
    branches: [main, develop]

jobs:
  versioning:
    name: Determine version, Test, Build and Release
    permissions: write-all

    runs-on: ubuntu-latest
    outputs:
      branchname: ${{ steps.versioninfo.outputs.branchname }}
      commithash: ${{ steps.versioninfo.outputs.commithash }}
      buildtimestamp: ${{ steps.versioninfo.outputs.buildtimestamp }}
      lastmajordigit: ${{ steps.versioninfo.outputs.lastmajordigit }}
      lastminordigit: ${{ steps.versioninfo.outputs.lastminordigit }}
      lastpatchdigit: ${{ steps.versioninfo.outputs.lastpatchdigit }}
      lastversion: ${{ steps.versioninfo.outputs.lastversion }}
      nextmajordigit: ${{ steps.selectversion.outputs.nextmajordigit }}
      nextminordigit: ${{ steps.selectversion.outputs.nextminordigit }}
      nextpatchdigit: ${{ steps.selectversion.outputs.nextpatchdigit }}
      buildversion: ${{ steps.selectversion.outputs.buildversion }}
      buildversionfilename: ${{ steps.selectversion.outputs.buildversionfilename }}
The outputs section defines some internal workflow variables to collect data in the different steps further down. Notice how the name of the step is used between steps. and .outputs
Next a number of steps are listed, which will be executed sequentially. I’m not 100% sure what caching does, but I think it speeds up data-exchange between the steps. This workflow runs to completion in under a minute, so it’s not bad:
steps:
  - name: Enable caching
    uses: actions/cache@v3
    with:
      path: |
        ~/.cache/pip
        ~/.platformio/.cache
      key: ${{ runner.os }}-pio

  - name: Checkout Repository
    uses: actions/checkout@v3
    with:
      fetch-depth: 0
Next step runs a series of shell commands to fetch the latest version, latest commit hash and current timestamp from Git. The values are stored in the outputs defined above:
- name: Get version data
  id: versioninfo
  run: |
    echo "extract branch name from github_ref '${{ github.ref }}'"
    declare branchname=$(echo "${{ github.ref }}" | cut -d'/' -f 3-)
    echo "clean branch name = $branchname"
    echo "extract commit short hash : $(git rev-parse --short HEAD)"
    declare commithash=$(git rev-parse --short HEAD)
    echo "extract build timestamp"
    declare buildtimestamp=$(date "+%Y-%b-%d-%H:%M:%S")
    echo "buildtimestamp = $buildtimestamp"
    declare fulltag=$(git describe --tag $(git rev-parse --verify refs/remotes/origin/main))
    echo "fulltag = [$fulltag]"
    declare versiontag=$(echo $fulltag | cut -d'-' -f1)
    echo "extract SemVer numbers from version tag [$versiontag]"
    declare -i lastmajordigit=$(echo $versiontag | cut -c 1- | cut -d'.' -f1)
    echo "lastmajordigit = $lastmajordigit"
    declare -i lastminordigit=$(echo $versiontag | cut -c 1- | cut -d'.' -f2)
    echo "lastminordigit = $lastminordigit"
    declare -i lastpatchdigit=$(echo $versiontag | cut -c 1- | cut -d'.' -f3)
    echo "lastpatchdigit = $lastpatchdigit"
    declare lastversion="v$lastmajordigit.$lastminordigit.$lastpatchdigit"
    echo "output variables to GitHub Actions"
    echo "branchname=$branchname" >> $GITHUB_OUTPUT
    echo "lastmajordigit=$lastmajordigit" >> $GITHUB_OUTPUT
    echo "lastminordigit=$lastminordigit" >> $GITHUB_OUTPUT
    echo "lastpatchdigit=$lastpatchdigit" >> $GITHUB_OUTPUT
    echo "commithash=$commithash" >> $GITHUB_OUTPUT
    echo "buildtimestamp=$buildtimestamp" >> $GITHUB_OUTPUT
    echo "lastversion=$lastversion" >> $GITHUB_OUTPUT
The next step determines what version we are building. If not running on the main branch, it’s simply the uses the latest version plus a commit hash. If we are on main, then we check the merge commit message to determine what next version to generate:
- name: Determine which version to build
  id: selectversion
  run: |
    echo "Triggered from Branch : ${{ steps.versioninfo.outputs.branchname }}"
    echo "Commit hash           : ${{ steps.versioninfo.outputs.commithash }}"
    echo "Last version          : ${{ steps.versioninfo.outputs.lastversion }}"
    echo "  Major               : ${{ steps.versioninfo.outputs.lastmajordigit }}"
    echo "  Minor               : ${{ steps.versioninfo.outputs.lastminordigit }}"
    echo "  Patch               : ${{ steps.versioninfo.outputs.lastpatchdigit }}"
    if [ "${{ steps.versioninfo.outputs.branchname }}" == "main" ]; then
      echo "Triggered from merge on main branch with commit title : ${{ github.event.head_commit.message }}"
      if [[ "${{ github.event.head_commit.message }}" == *"major"* ]]; then
        echo "Incrementing Major versionDigit"
        declare -i nextmajordigit=${{ steps.versioninfo.outputs.lastmajordigit }}+1
        declare -i nextminordigit=0
        declare -i nextpatchdigit=0
        declare buildversion="v$nextmajordigit.$nextminordigit.$nextpatchdigit"
        declare buildversionfilename=$(echo "${buildversion//./_}")

      elif [[ "${{ github.event.head_commit.message }}" == *"minor"* ]]; then
        echo "Incrementing Minor versionDigit"
        declare -i nextmajordigit=${{ steps.versioninfo.outputs.lastmajordigit }}
        declare -i nextminordigit=${{ steps.versioninfo.outputs.lastminordigit }}+1
        declare -i nextpatchdigit=0
        declare buildversion="v$nextmajordigit.$nextminordigit.$nextpatchdigit"
        declare buildversionfilename=$(echo "${buildversion//./_}")
      else
        echo "Incrementing Patch versionDigit"
        declare -i nextmajordigit=${{ steps.versioninfo.outputs.lastmajordigit }}
        declare -i nextminordigit=${{ steps.versioninfo.outputs.lastminordigit }}
        declare -i nextpatchdigit=${{ steps.versioninfo.outputs.lastpatchdigit }}+1
        declare buildversion="v$nextmajordigit.$nextminordigit.$nextpatchdigit"
        declare buildversionfilename=$(echo "${buildversion//./_}")
      fi
    else
      echo "Not on main branch -> development version"
      declare -i nextmajordigit=${{ steps.versioninfo.outputs.lastmajordigit }}
      declare -i nextminordigit=${{ steps.versioninfo.outputs.lastminordigit }}
      declare -i nextpatchdigit=${{ steps.versioninfo.outputs.lastpatchdigit }}
      declare buildversion="v$nextmajordigit.$nextminordigit.$nextpatchdigit-${{ steps.versioninfo.outputs.commithash }}"
      declare buildversionfilename=$(echo "${buildversion//./_}")
    fi
    echo "Building Version : $buildversion"
    echo "  Major          : $nextmajordigit"
    echo "  Minor          : $nextminordigit"
    echo "  Patch          : $nextpatchdigit"
    echo "Filename         : $buildversionfilename"
    echo "output variables to GitHub Actions"
    echo "nextmajordigit=$nextmajordigit" >> $GITHUB_OUTPUT
    echo "nextminordigit=$nextminordigit" >> $GITHUB_OUTPUT
    echo "nextpatchdigit=$nextpatchdigit" >> $GITHUB_OUTPUT
    echo "buildversion=$buildversion" >> $GITHUB_OUTPUT
    echo "buildversionfilename=$buildversionfilename" >> $GITHUB_OUTPUT
Then we write the buildinfo.cpp file:
- name: Save Build info
  uses: "DamianReeves/write-file-action@master"
  with:
    path: lib/version/buildinfo.cpp
    write-mode: overwrite
    contents: |
      // ##########################################################################
      // ### This file is generated by Build and Continuous Integration scripts ###
      // ###   .github/workflows/buildinfo.py for local development environment ###
      // ###   .github/workflows/testbuildrelease.yml for CI environment        ###
      // ### Changes will be overwritten on the next build                      ###
      // ##########################################################################
      #include "buildinfo.h"
      const buildEnvironment buildInfo::theBuildEnvironment{buildEnvironment::ci};
      const buildType buildInfo::theBuildType{buildType::production};
      const int buildInfo::mainVersionDigit   = ${{ steps.selectversion.outputs.nextmajordigit }};
      const int buildInfo::minorVersionDigit  = ${{ steps.selectversion.outputs.nextminordigit }};
      const int buildInfo::patchVersionDigit  = ${{ steps.selectversion.outputs.nextpatchdigit }};
      const char* buildInfo::lastCommitTag    = "${{ steps.versioninfo.outputs.commithash }}";
      const char* buildInfo::buildTimeStamp   = "${{ steps.versioninfo.outputs.buildtimestamp }}";
Next steps install PlatformIO, run all unit tests and upload the test results to codecov.io:
- name: Install PlatformIO Core
  run: pip install --upgrade platformio

- name: Run all generic unit tests
  run: |
    pio test -e all_generic_unittests

- name: Upload coverage reports to Codecov
  uses: codecov/codecov-action@v3
  with:
    gcov: true
    gcov_include: '.pio/build/all_generic_unittests/*'
  env:
    CODECOV_TOKEN: ${{ secrets.CODECOV_TOKEN }}
This step then builds the application:
- name: Build
  run: |
    pio run -e production_application
Finally the resulting binary is attached to the workflow, and when doing a release, also to the release:
- name: Attach Binary to Workflow run
  id: attachbinarytoworkflowrun
  uses: actions/upload-artifact@v3
  with:
    name: ${{ steps.selectversion.outputs.buildversionfilename }}.hex
    path: .pio/build/production_application/firmware.hex
    if-no-files-found: error

- name: Release when on main branch
  id: createrelease
  uses: actions/create-release@v1
  if: ${{ steps.versioninfo.outputs.branchname == 'main'}}
  env:
    GITHUB_TOKEN: ${{ secrets.GITHUB_TOKEN }}
  with:
    tag_name: ${{ steps.selectversion.outputs.buildversion }}
    release_name: Release ${{ steps.selectversion.outputs.buildversion }}
    draft: false
    prerelease: false

- name: Attach Binary to Release
  id: attachbinarytorelease
  uses: actions/upload-release-asset@v1
  if: ${{ steps.versioninfo.outputs.branchname == 'main'}}
  env:
    GITHUB_TOKEN: ${{ secrets.GITHUB_TOKEN }}
  with:
    upload_url: ${{ steps.createrelease.outputs.upload_url }}
    asset_path: .pio/build/production_application/firmware.hex
    asset_name: ${{ steps.selectversion.outputs.buildversionfilename }}.hex
    asset_content_type: application/octet-stream
Further Improvements
Congratulations, you’ve made it to the end of this blog post which was certainly not an easy read. You can further discuss this topic on the PlatformIO forum. Suggestions for improvements are also very welcome, simply post an issue on the demo repository.
Thank you.
Stay in touch with us
Stay tuned to this blog or follow us on LinkedIn and Twitter @PlatformIO_Org to keep up to date with the latest news, articles and tips!