Getting Started with Code Coverage in PlatformIO: A Beginner's Guide to Writing Effective Tests
Guest post
An introduction to the concept of code coverage analysis in the PlatformIO ecosystem
In the world of software development, it’s essential to ensure that the code being written is not only functional but also maintainable and easily testable. One way to measure the effectiveness of testing is to analyze the code coverage to identify areas of the code that are not adequately tested. In this article, we’ll delve into the concept of source code coverage analysis, its importance, and some tools available for performing the analysis.
One of the crucial components of proper code coverage analysis is testing, and having a comprehensive test suite is essential to achieving high code coverage. Testing is well supported in PlatformIO and I only refer to the PlatformIO Unit Testing documentation and to some getting started blog-posts Unit Testing with PlatformIO: Part 1. The Basics. If you have never done unit testing, get this working first, then come back for the code coverage.
Table of Contents
- Prerequisites
- What is Code Coverage?
- Preparing Demo Project
- Preparing Code Coverage Data Files
- Visualizing Results
- Conclusion
Prerequisites
This article uses the following components:
What is Code Coverage?
Code coverage analysis provides developers with valuable insights into how thoroughly their tests are exercising the code, highlighting areas that may need additional testing to increase the overall quality of your code.
There are various types of code coverage analysis, including statement coverage, branch coverage, and path coverage. Statement coverage measures how many statements in the code have been executed during testing, while branch coverage measures how many branches in the code have been executed. Path coverage is the most comprehensive form of code coverage analysis, measuring how many unique paths through the code have been executed during testing.
Preparing Demo Project
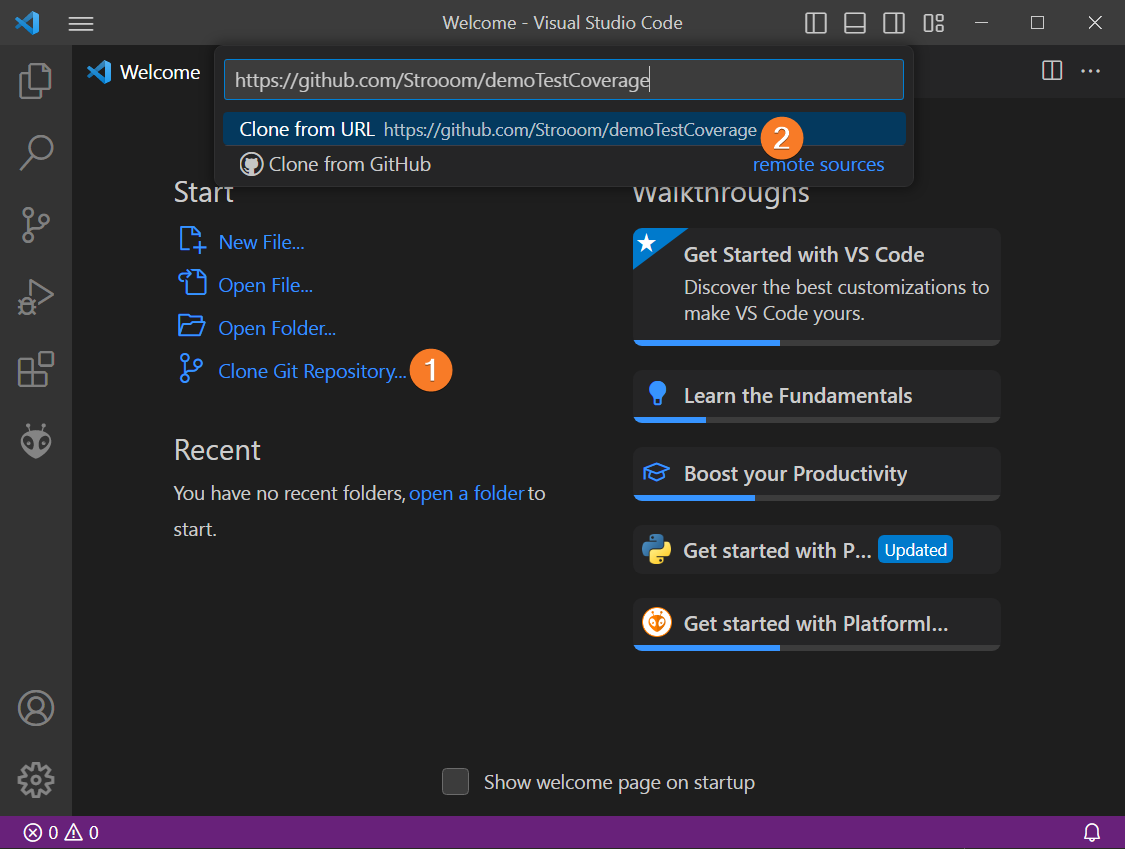
For the demo, I am going to take a small and simple piece of code, so you won’t waste your time trying to understand the code. The complete project used in this article is available on Github Strooom/demoTestCoverage: How to do test coverage on PlatformIO. You can import it directly from the VSCode Welcome Page:
Let’s take a closer look at the lib/key module that we’ll be testing in this post:
The functionality of the module is described in the key.h header file:
#pragma once
#include <stdint.h>

class key {
  public:
    static uint8_t toUpperCase(uint8_t aCharacter);            // convert a character to upper case
    static bool isHexCharacter(uint8_t aCharacter);            // check if a character is a valid hex character, ie. 0-9 or A-F - assuming upper case
    static uint8_t valueFromHexCharacter(uint8_t aCharacter);  // convert a hex character to a value, ie. 'A' -> 10
    static uint8_t hexCharacterFromValue(uint8_t aValue);      // convert a value to a hex character, ie. 10 -> 'A'
};
The implementation is located in the accompanying key.cpp:
#include "key.h"

uint8_t key::toUpperCase(uint8_t aCharacter) {
    if (aCharacter >= 'a' && aCharacter <= 'z') {
        aCharacter = aCharacter - 'a' + 'A';
    }
    return aCharacter;
}

bool key::isHexCharacter(uint8_t aCharacter) {
    return ((aCharacter >= 'A' && aCharacter <= 'F') || (aCharacter >= '0' && aCharacter <= '9'));
}

uint8_t key::valueFromHexCharacter(uint8_t aCharacter) {
    if (aCharacter >= '0' && aCharacter <= '9') {
        return aCharacter - '0';
    }
    if (aCharacter >= 'A' && aCharacter <= 'F') {
        return aCharacter - 'A' + 10;
    }
    return 0;        // in case the character is not a hex character, return 0 as value
}

uint8_t key::hexCharacterFromValue(uint8_t aValue) {
    if (aValue <= 9) {
        return aValue + '0';
    } else if (aValue <= 15) {
        return aValue - 10 + 'A';
    } else
        return '?';
}
To test these 4 member functions, I have created a test application using Unity as the unit testing framework. You can find the test application at test/test_key/test.cpp.
#include <unity.h>
#include "key.h"

void setUp(void) {}           // before test
void tearDown(void) {}        // after test

void test_toUpperCase() {
    TEST_ASSERT_EQUAL_UINT8(static_cast<uint8_t>('A'), key::toUpperCase(static_cast<uint8_t>('a')));
    TEST_ASSERT_EQUAL_UINT8(static_cast<uint8_t>('A'), key::toUpperCase(static_cast<uint8_t>('A')));
    TEST_ASSERT_EQUAL_UINT8(static_cast<uint8_t>('0'), key::toUpperCase(static_cast<uint8_t>('0')));
}

void test_isHexCharacter() {
    TEST_ASSERT_TRUE(key::isHexCharacter(static_cast<uint8_t>('0')));
    TEST_ASSERT_TRUE(key::isHexCharacter(static_cast<uint8_t>('9')));
    TEST_ASSERT_TRUE(key::isHexCharacter(static_cast<uint8_t>('A')));
    TEST_ASSERT_TRUE(key::isHexCharacter(static_cast<uint8_t>('F')));
    TEST_ASSERT_FALSE(key::isHexCharacter(static_cast<uint8_t>('-')));
    TEST_ASSERT_FALSE(key::isHexCharacter(static_cast<uint8_t>('O')));
    TEST_ASSERT_FALSE(key::isHexCharacter(static_cast<uint8_t>('a')));        // we assume uppercase, so lowercase should fail...
}

void test_valueFromHexCharacter() {
    TEST_ASSERT_EQUAL_UINT8(0U, key::valueFromHexCharacter(static_cast<uint8_t>('0')));
    TEST_ASSERT_EQUAL_UINT8(9U, key::valueFromHexCharacter(static_cast<uint8_t>('9')));
    TEST_ASSERT_EQUAL_UINT8(10U, key::valueFromHexCharacter(static_cast<uint8_t>('A')));
    TEST_ASSERT_EQUAL_UINT8(15U, key::valueFromHexCharacter(static_cast<uint8_t>('F')));
}

void test_hexCharacterFromValue() {
    TEST_ASSERT_EQUAL_UINT8(static_cast<uint8_t>('0'), key::hexCharacterFromValue(0U));
    TEST_ASSERT_EQUAL_UINT8(static_cast<uint8_t>('9'), key::hexCharacterFromValue(9U));
    TEST_ASSERT_EQUAL_UINT8(static_cast<uint8_t>('A'), key::hexCharacterFromValue(10U));
    TEST_ASSERT_EQUAL_UINT8(static_cast<uint8_t>('F'), key::hexCharacterFromValue(15U));
    TEST_ASSERT_EQUAL_UINT8(static_cast<uint8_t>('?'), key::hexCharacterFromValue(16U));
}

int main(int argc, char **argv) {
    UNITY_BEGIN();
    RUN_TEST(test_toUpperCase);
    RUN_TEST(test_isHexCharacter);
    RUN_TEST(test_valueFromHexCharacter);
    // RUN_TEST(test_hexCharacterFromValue);
    UNITY_END();
}
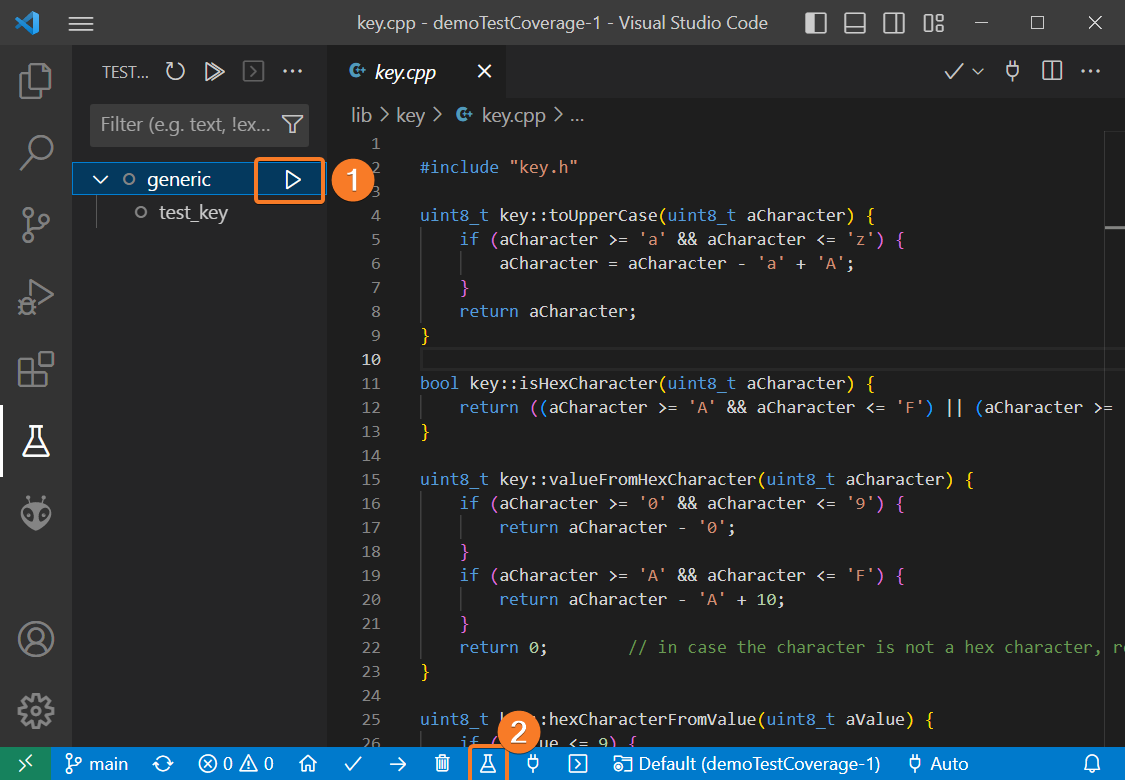
So now we can run the tests. There are two ways to do this: using the PlatformIO test icon in the bottom status bar or via the Test Explorer view:
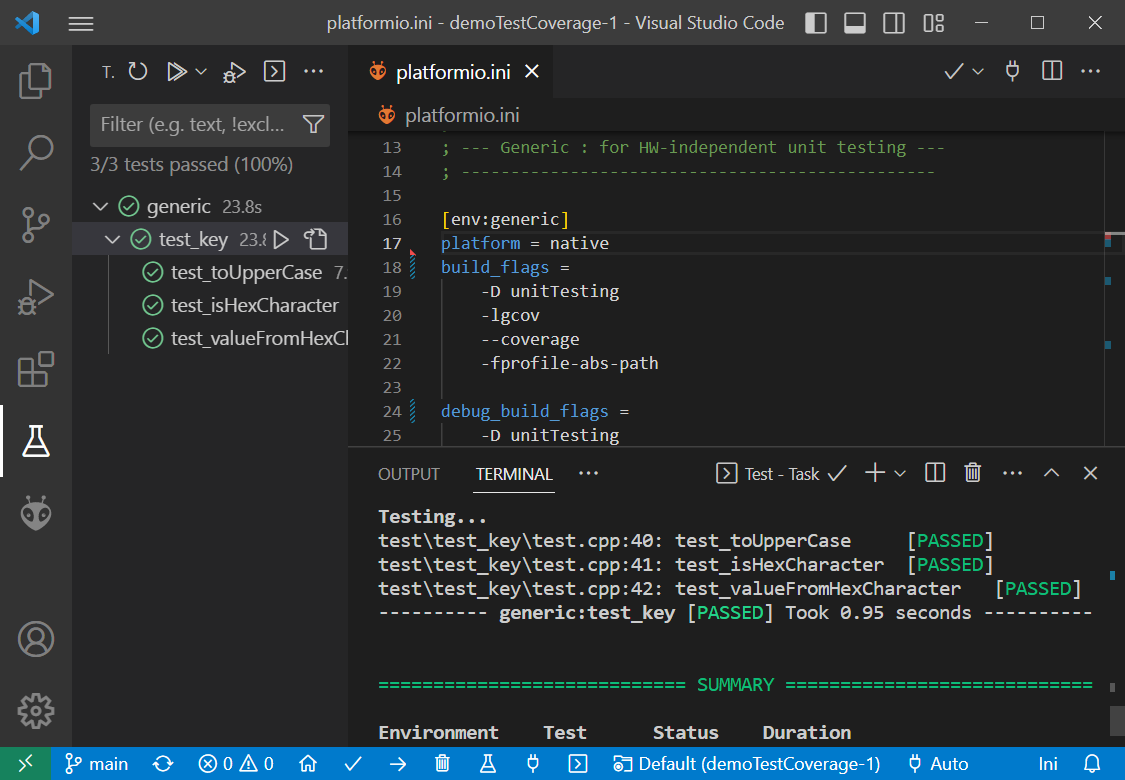
After processing, we should see a detailed report about the successful testing results:
Preparing Code Coverage Data Files
Our tests are now running, and we can see which ones pass and which ones fail. Next, let’s take a closer look at the specific parts of the code being tested. To do so, we need to configure the compiler to generate some additional information. This allows us to track which statements are executed while running the code.
[env:generic]
platform = native
build_flags =
    -D unitTesting
    -lgcov
    --coverage
    -fprofile-abs-path
Note the 3 extra build flags: -lgcov, --coverage, -fprofile-abs-path. With these flags, the compiler creates extra files (.gcda, .gcdo) to track code execution. You can find them in the .pio/build/generic folder:
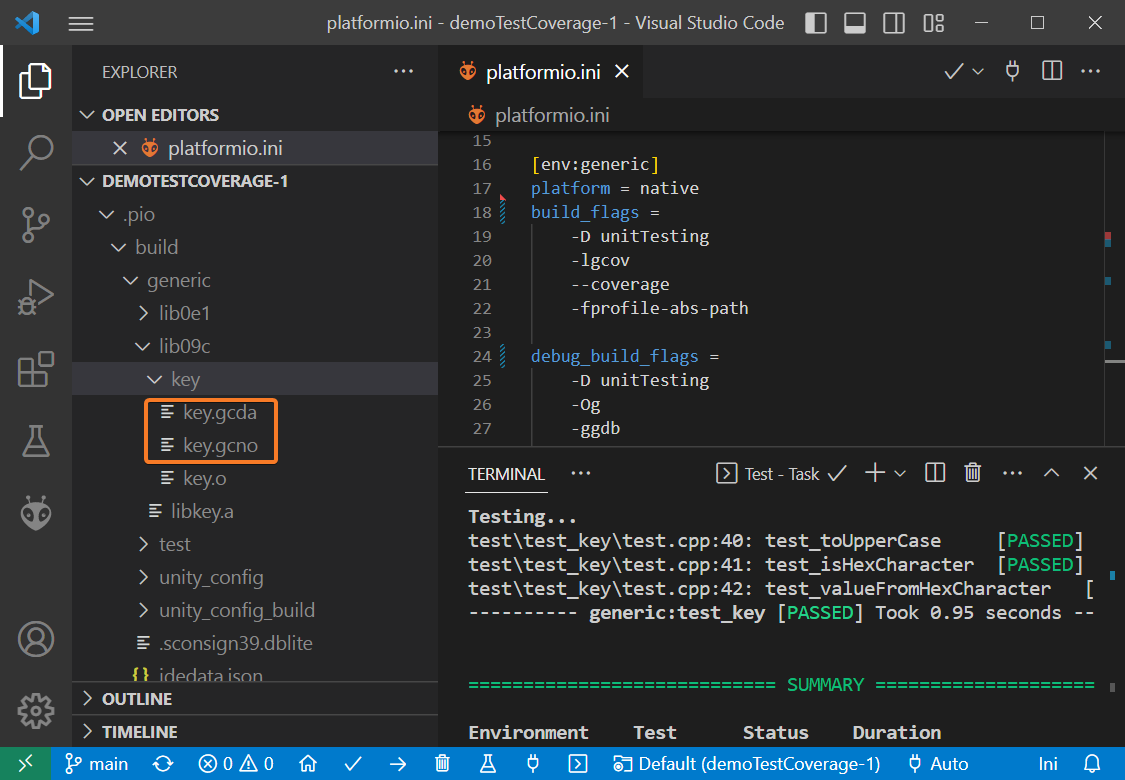
These files will be used to visualize what parts of the code were executed.
Visualizing Results
The only thing missing is a nice visualization of the results. Luckily, for this there is a good VSCode extension called Gcov Viewer.
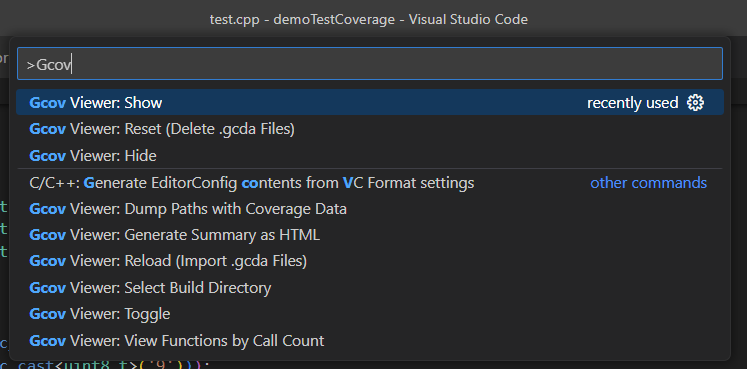
This extension is controlled via the Command Palette, which is a minor burden but you’ll get used to it quickly. ctrl/cmd-shift-p and type “Gcov”, this will show you all the Gcov commands. The 3 most important are Show, Hide and Reset and they will settle themselves on top with your “recently used” commands:
Select “Gcov Show” and it will create an overlay on your source code files, showing which lines have been executed and which not. If you want the non-executed lines to show in red, you need to activate a setting of the Gcov extension “Highlight Missed Lines”. I prefer this, as this way it is more obvious which lines are missed. Several lines of your source code do not translate to executable code and those lines just remain uncolored.
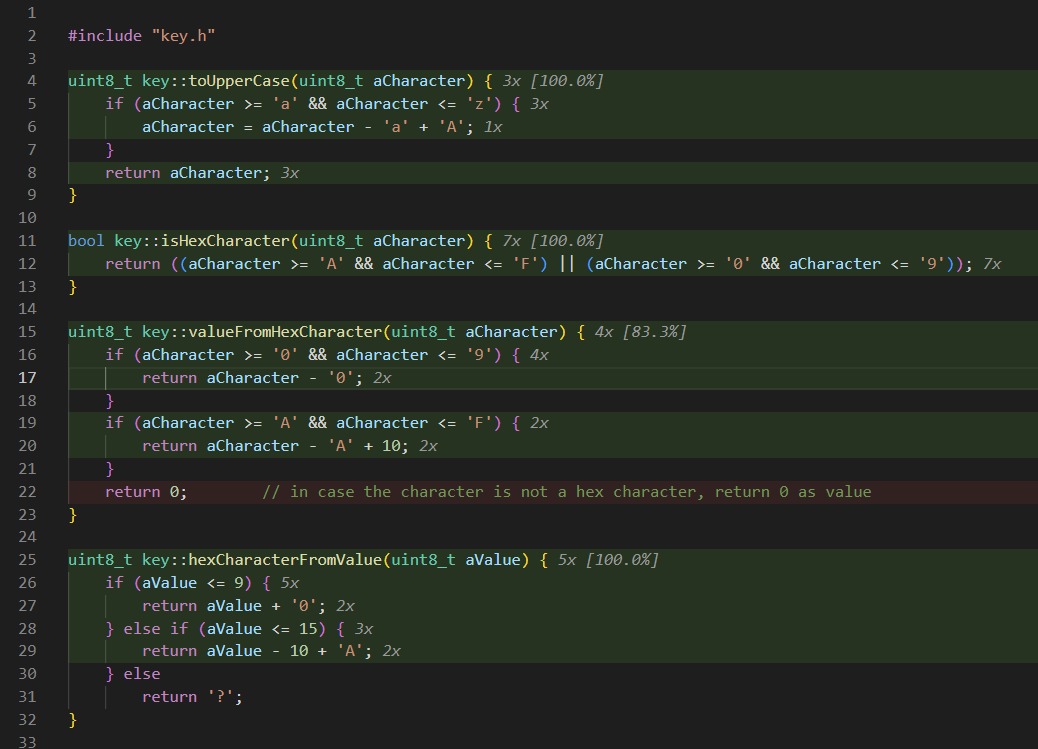
Note how each line has a color and a number of how many times it has been executed. However, our test misses the edge case where valueFromHexCharacter receives an invalid input, so we need to fix that.
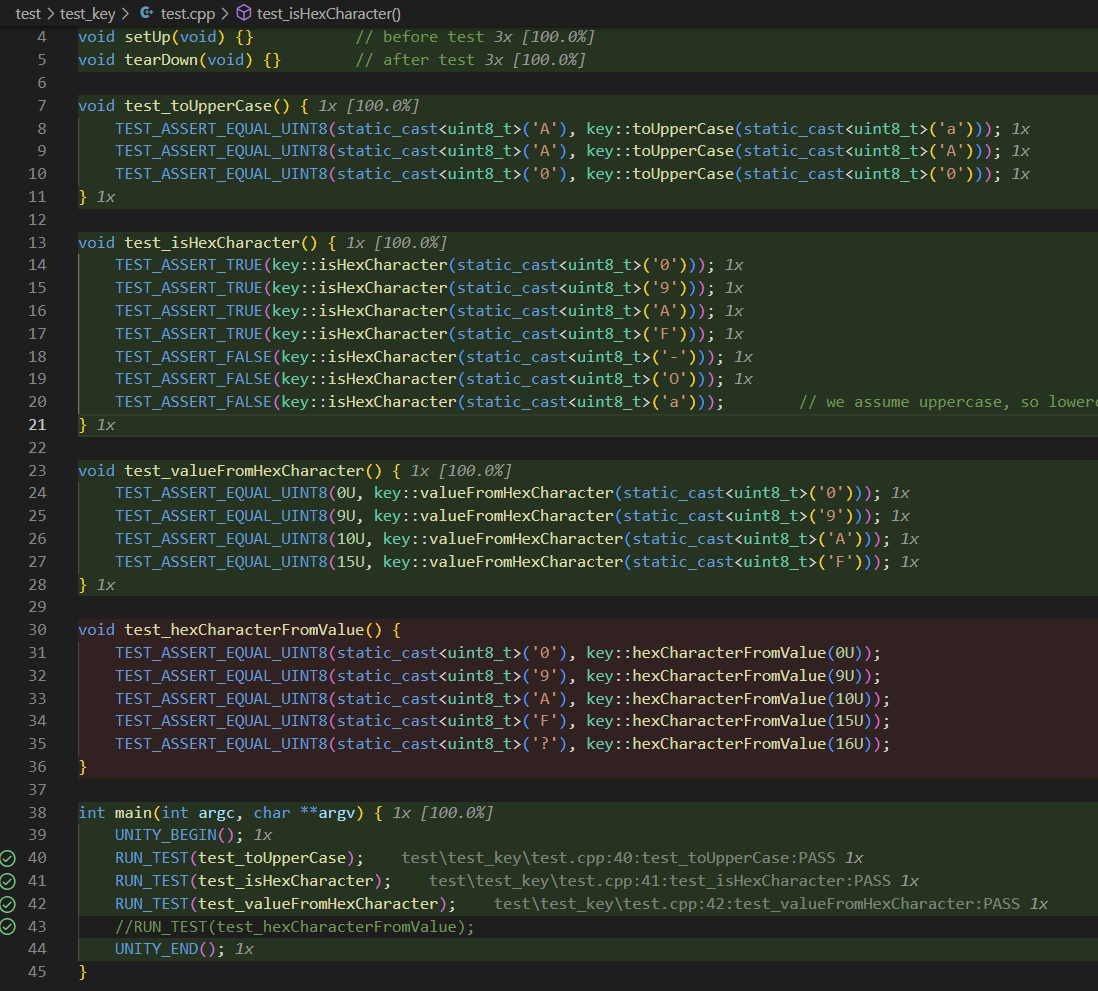
We saw that GCC creates a coverage file for each “.cpp” file in our project. This means that also our test application itself is tracked. Look how one of the tests is not being run, because I commented it out in the test-runner main().
When you improve your tests and rerun them, the results will continue to be added to the .gcno and .gcda files that are already present. However, at some point, you may want to reset your results and start over. To do so, you can use the “Gcov Reset” command.
Conclusion
Code coverage analysis is an essential aspect of software development that provides insight into the effectiveness of testing and identifies areas of the code that may need further attention. By using best practices in testing and code coverage analysis, software developers can produce high-quality code that is reliable, maintainable, and robust.